Back when I first joined the St. Louis Modern Quilt Guild, I found myself in need of something to tote my show-and-tell quilts back and forth to meetings. Fast forward to my first Saturday Sew-In with the Guild, when my need for a really, really, large tote became even more obvious. Enter what I fondly think of as my Ginormous Tote bag.
Now, I’ll admit that sewing three-dimensional things is not my favorite activity. And I know there are many fabulous patterns out there for large sewing totes with lots of bells and whistles. But considering that I just don’t enjoy this type of sewing very much, I wanted something that was very quick and very easy. Since it was going to be BIG, I also wanted to take advantage of showing off one or more of my favorite large-scale prints. The pattern I came up with met all of my requirements and has been extraordinarily useful. I use it to bring quilts to meetings, schlepp them around town for various reasons, and it even holds my cutting board and 24″ ruler for Sew-Ins.
Plus, when I’m not using it, it folds up
like
this:
I’ve gotten several comments on the tote, so I thought it might be useful to do a quick tutorial here. Like I said, this is a very basic bag that you could probably figure out on your own. Essentially, its just a yard of fabric folded in half, stitched, and with boxed corners. But it does its job admirably, and it doesn’t even require that many materials. Plus, using it offers the chance to admire your favorite fabrics in all their glory. So here goes–if you make one, please share your photos on my flickr group!!
Materials:
You will need:
1 yard of your favorite fabric for the exterior (large-scale prints work especially well, here)
1 yard of cotton duck, for structuring the exterior
1 yard of batting (a little larger than 45″ X 36″) for exterior
1 yard of coordinating fabric for the lining
1/2 yard coordinating fabric for exterior pockets (1 yard for directional prints that run perpendicular to the selvages)
1/4 yard coordinating fabric for straps
2 yards heavy fusible interfacing
4 swivel clasps
1/2 yard of coordinating fabric for binding the bag and attaching clasps
Step 1: Quilt the exterior
Layer cotton duck, batting, and exterior fabric and baste. Since you are using a yard of each and will be trimming down after quilting, there is no need to cut now. *However* if you are using a directional print, you will want to follow the next step before you layer and quilt.
If using a directional fabric, you’ll need to do a little preparation so that your print doesn’t end up upside down on one side of the tote. Simply cut the yard of fabric in half perpendicular to the selvages (and the print), flip one half so that it faces the opposite direction, and sew with right sides together using a 1/2″ seam (we want this to be nice and strong, since it will bear the weight of whatever you put in the bag).
Quilt using straight lines or another all-over pattern of your choice
Trim so that all edges are flush
Step 2: Make the pockets
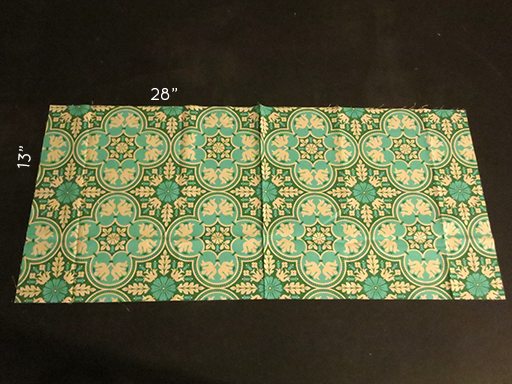
From your pocket fabric, cut one rectangle measuring 13″ by28″. If using a directional print, cut the fabric in half along the 13″ edge, flip one half, and stitch together using a 1/4″ seam (so that print is right side up on both sides of the bag).
Hem the short edges of the rectangle with a 1/4″ hem
Lay out your exterior with the exterior fabric facing up. Center the pocket fabric as shown in the photo; staystitch to the exterior 1/4″ from each long edge.
 Measure 7″ down from each hemmed edge of the pockets and mark a line parallel to the hemmed edge. Stitch along this line to close off the bottoms of the pockets
Step 3: Make and attach the straps
From strap fabric, cut 4 strips measuring 4″ by the width of the fabric; cut one of these in half, lengthwise, so it measures 4″ by about 20.”
Sew one fabric strip to another on the bias, as if you were making binding.
Trim seam and press open.
Repeat with the rest of the fabric strips so that you have one long fabric strip. Sew the two ends of this strip together on the bias so that you have a ring of fabric. (Make sure the fabric isn’t twisted when you sew the final seam!)
Cut 2″ wide strips of interfacing to equal the total length of your strap (since different fabrics have different widths and this will have determined the length of your strap, I’m not giving exact measurements, here). Fuse the strips of interfacing to the center of the wrong side of the fabric strip.
Fold the edges of the fabric in so that they meet in the middle.
Fold the strap in half lengthwise and press to crease.
Stitch several times along the length of the strap to reinforce.
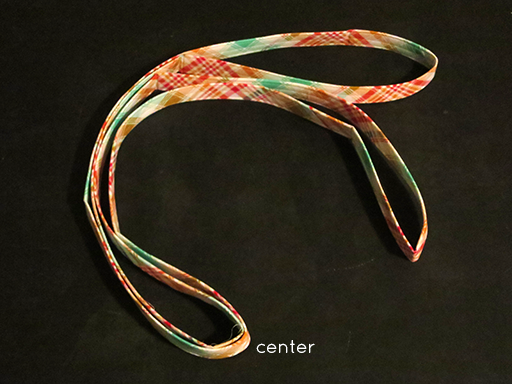
Fold the ring in half and mark the center of each side, as shown.
Lay out the exterior of the bag with the right side facing up; find the center. Place the straps on top with the center markings matching and the straps covering the raw edges of the pockets. The straps will lie on the exterior along two lines, with the excess extending beyond the bag exterior to form the part that goes over your shoulder. (At this point, make sure that there are no twists in your straps!) Beginning 1″ from one edge of the exterior, stitch along the length of the strap to 1″ from the other edge, close to the edge of the strap; repeat along the other edge of the strap. Do this for both straps.
Step 4: Assemble the bag and lining
Cut your lining fabric to measure the same size as the exterior.
Fold the exterior in half with right sides together. Using a 1/2″ seam allowance, stitch along both side edges.
Open up the bag and fold down one stitched edge so that it forms a point. Holding your ruler perpendicular to the seam, find the line where the width of the point is 9″.
Stitch along this line to create a boxed corner; trim within 1/2″ of the stitching line. Repeat for other stitched edge.
Hint: The length of the stitching line will determine the depth of the bag, so you can adjust the size of your tote by changing where you stitch. If you would like a wider, shallower bag, move your stitching line nearer to the point; if you would like a narrower, deeper bag, move the stitching line farther away from the point.
Stitch the lining the same way as the exterior: fold in half perpendicular to the selvages, stitch the short edges, fold to form points, stitch across the points (using the same measurements you used for the exterior!) and trim.
Hint: Make *sure* that you fold the lining fabric along the same dimensions as you folded the exterior. (Ask me how I know this.)
Turn the exterior of the bag right side out and the lining right side in. Nest the lining inside of the exterior, aligning raw edges, and pin. Staystitch 1/4″ from the raw edges, all the way around the top of the bag
Step 5: Finishing
Prepare 112″ of bias or straight grain binding. Cut off 12″ and unfold. Fold in half with right sides together and stitch close to the raw edges. Turn right side out and press flat to form the clasp attachments. Cut into four 3″ sections; loop each section through the ring attachment of a clasp.
On the bag, mark the center points between the two side seams. Center a clasp attachments at each marking and seam and staystitch in place on the lining side of the top of the bag
Pin the remaining binding with raw edges aligned with raw edges of bag top, as if you were binding a quilt. Stitch 1/4″ from the raw edge; fold over and hand stitch to inside of bag.
And there you have it–a super simple tote that’s big enough to hold all of your stuff but folds down for easy storage. I hope you find this tutorial helpful, and I’d love to see any bags from it! Thanks again for reading!


Thanks! I hate the 3rd dimension too so simple is good for me. Pinned!
Such a great tutorial and use of notting hill!!!! LOVE it!
Oh my gosh! I needed this a few weeks ago, before my big giant bag making lesson in patience! Really cute and functional; nice!!
You are the bomb! Thanks for the tutorial and all the inspiration.
Ooh Casey…I’m so very tempted to give this a try. It looks great!
Looooove the bag!!! ;) and the fabric you picked out!
Wow, that is much easier than it looks finished! Thanks for sharing!
Nice!
Fabulous tutorial, Casey! Love this bag!
Pingback: Classes! |
Question for you – in step 3 you say to cut 4 strips, and to cut one of the strips in half. You then say to sew all the strips together.
Is the purpose of the half stip to make the clasp attachments in step 5?
Thanks
Hi Janet,
Thanks for your question!
The purpose of cutting one of the strips in half is to establish the total length of the strap. I wanted to keep the instructions as free of measuring as possible, and three WOF strips of about 40-45″ plus one half strip of about 20-22″ will give you a shoulder-length strap. You then sew all of the strips together so that the strap is all one piece (and supports the bag from the bottom rather than the sides). The clasp attachments are made from the binding strip, but feel free to make them from the excess strap material instead!
Pingback: Marching Along | Towanda
Pingback: So Many Bags, So Little Time + a Tutorial |
Pingback: A Few Finished Bags | Dandelion Stitching Company