
Here are the instructions for how I made the hardcover needle books I posted about yesterday. I hope you find them useful–this is my first tutorial here on the blog, so please go easy on me. If you make a needle book, please share it in the Casey York flickr pool!

You will need two coordinating fabrics for the inside and outside of the book, a piece of wool felt for the “pages” that will hold the needles, a 12″ length of ribbon for the ties, and some cardboard to create the hard covers.

Step 1: Prepare your materials
From your cardboard, cut two rectangles measuring 3 ½ X 4 ½.”
From your exterior fabric, cut one rectangle measuring 8 X 5 ¼.”
(This is a good opportunity to fussy cut a motif from your exterior fabric for the front of the needle book. If you do this, remember that the “front” side of the book will correspond to the right hand side of your rectangle.)
From your interior fabric, cut one rectangle measuring 8 X 5 ¼, ” and one rectangle measuring 8 X 3 ½.”
From your felt, cut one rectangle measuring 6 ¾ X 4.”
Step 2: Make the interior pockets

Along one long side of the 8 X 3 ½ “ rectangle, sew a ¼ “ hem.

Line up the other long edge along one long edge of the interior fabric and stitch 1/8” from edge along the side and bottom edges.

Fold in half widthwise and press to create a crease marking the center.

Fold each outer edge in to meet the crease and press to mark the half-way point of each inner cover.

To subdivide pockets, stitch along these creases from the lower edge to the top edge of the pocket fabric.
Step 3: Assemble the book

To create the ties, cut two 6” lengths of ribbon and stitch one to the center of each short edge of the inner fabric. Make sure to have the ribbons pointing towards the center of the fabric; this way they will be on the outside of the fabric sleeve you will be making for the cardboard covers. I backstitched over these a few times to make sure they were secure.
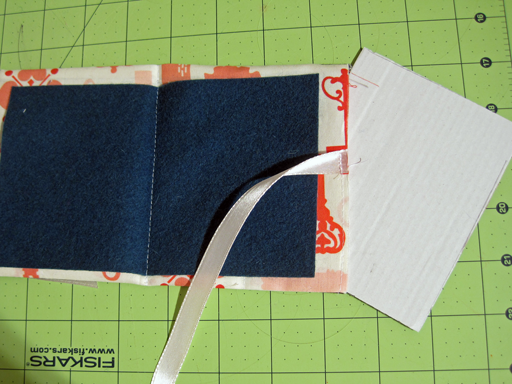
Place the inner fabric and outer fabric right sides together and stitch along three edges, leaving one short edge completely open. Clip corners, turn right side out,and press flat.

Slide one cardboard rectangle into the sleeve; it should fit snuggly. Push it as far into the sleeve as you can.

Center your felt pages on the inside of the cover and pin.

Using your machine’s zipper foot, stitch down the center of the cover as close as possible to the cardboard insert—this will create the spine of your book.
Insert the second cardboard cover piece, again sliding it in as far as possible. Fold in the open fabric edges and press; slip stitch closed.

Stock with your embroidery scissors, thread, and, of course, needles and enjoy!


Great tutorial, Casey. Thank you. I like that it’s a hard cover making it so handy to include scissors! Clever you!
Thank you! I hope you enjoy making them!
Pingback: Friday Finish: Needle Books |
Hey just wanted to give you a quick heads up.
The text in your content seem to be running off the screen in Internet explorer.
I’m not sure if this is a formatting issue or something to do with browser compatibility but I thought I’d post to
let you know. The design look great though! Hope
you get the issue solved soon. Cheers
Pingback: November 18 ~ Gifts for People Who Sew | Sew Mama Sew |
Very neat! I have pinned for the future!
So lovely I love the tutorial – clearly written — great job – love your ideas..
Pingback: What to give a stitcher? Needlebooks! | Dmcthread's Blog
beautiful… thanks crystalbluern at onlineok dot com
You could do as we did in the 60’s, use plastic from big containers,such as bleach bottles, cut up, etc. rather than cardboard.